How To Install Laravel
Once you’ve familiarized yourself with Laravel and the system requirements, you can begin installing it. The installation process is straightforward and consists of straightforward steps but they do vary from operating system to operating system.
Follow along with the instructions for your specific operating system below.
How To Install Laravel on Windows
To install Laravel on Windows, follow these detailed steps:
- Install XAMPP (to install PHP and MySQL)
- Install Composer
- Verify Composer installation
- Install Laravel using Composer
- Verify Laravel Installation
- Start the server
- Run the project in your browser
1. Install XAMPP
XAMPP is a free and open-source web server solution stack that includes PHP, MySQL, and Apache. To install XAMPP on Windows, follow these steps:
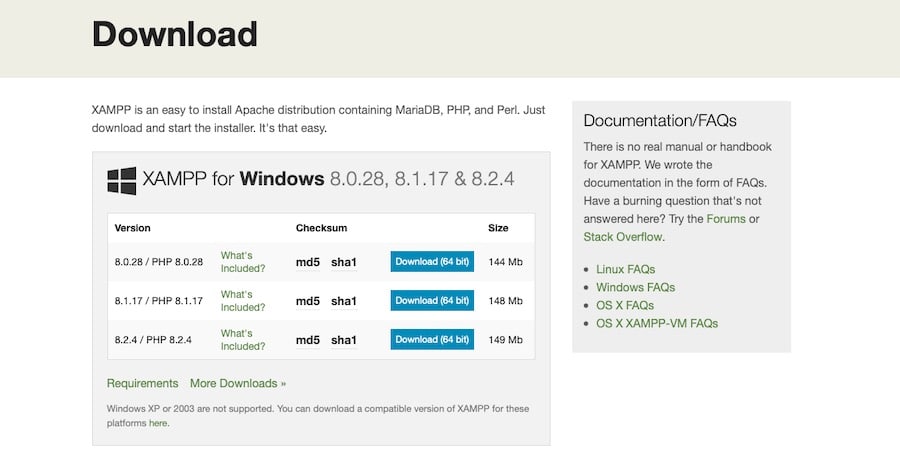
Visit the XAMPP download page and download the appropriate installer for your Windows version.
Run the installer and follow the on-screen instructions. During the installation process, you can choose which components to install. Make sure to select PHP and MySQL.
Once installed, launch the XAMPP Control Panel and start the Apache and MySQL services.
2. Install Composer
Composer is a dependency management tool for PHP that is required to install Laravel. To install Composer on Windows, follow these steps:
Visit the Composer download page and download the Composer-Setup.exe file.

Run the Composer-Setup.exe file and follow the on-screen instructions.
You’ll also be prompted to select the install mode. Be sure to pick Install for all users (recommended).
Make sure to select the correct PHP executable during the installation process (usually located in the XAMPP installation folder under xampp/php/php.exe).
Click Next to move through the on-screen instructions then click Install.
Once installation is completed, click Finish.
3. Verify Composer Installation
To verify that Composer was installed correctly, open the Command Prompt and run the following command:
composer --versionIf the installation was successful, you should see the Composer version displayed.
4. Install Laravel Using Composer
You can use Composer, which is now installed, to install Laravel globally on your system. To do so, open the Command Prompt and run the given command:
composer create-project laravel/laravel app-nameThis will automatically download all the relevant Laravel files to create a new project.
5. Verify Laravel Installation
To verify that Laravel was installed correctly, open the Command Prompt and run the following command:
laravel --versionAfter a successful installation, you will be able to see the Laravel version.
6. Start The Server
With your new app project created, you will then need to start a server. To do this, type in the following:
cd app-namephp artisan serve7. Run The Project In Your Browser
With the server started you should then be able to access your app project via your web browser. To do this, open your browser and go to the following: https://localhost:8000
With this, you can start developing web applications using Laravel on your Windows machine.
How To Install Laravel on macOS
To install Laravel on macOS, follow these detailed steps:
- Install Homebrew
- Install Node.js and npm
- Install PHP
- Install Composer
- Verify PHP and Composer installations
- Install Laravel using Composer
- Verify Laravel installation
- Create a new project
- Run the Laravel server
1. Install Homebrew
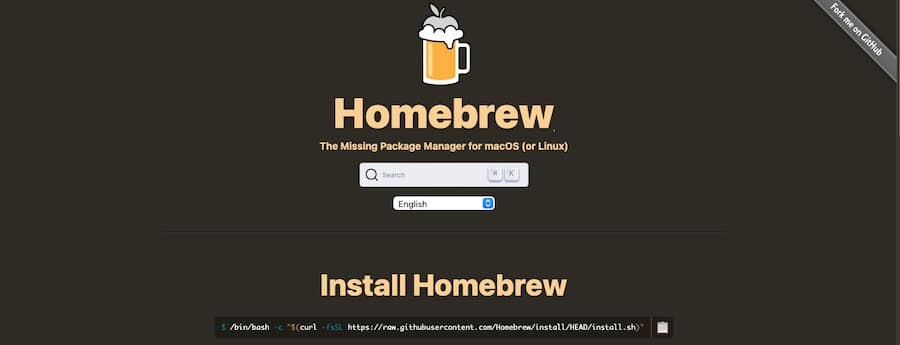
Homebrew is a package manager for macOS that simplifies the installation of software. To install Homebrew, open the Terminal and run the following command:
/bin/bash -c "$(curl -fsSL https://raw.githubusercontent.com/Homebrew/install/HEAD/install.sh)"Follow the on-screen instructions to complete the installation.
2. Install Node.js and npm
Next, install Node.js and npm (Node.js package manager) using Homebrew. In the Terminal, type the following command:
brew install nodeThis command installs both Node.js and npm on your system.
3. Install PHP
With Homebrew installed, you can now use it to install PHP. Run the following command in the Terminal:
brew install phpWait for the installation to complete.
4. Install Composer

Composer is a dependency management tool for PHP that is required to install Laravel. To install Composer on macOS, run the following commands in the Terminal:
curl -sS https://getcomposer.org/installer | php sudo mv composer.phar /usr/local/bin/composer5. Verify PHP and Composer Installations
To verify that PHP and Composer were installed correctly, open the Terminal and run the following commands:
php --version composer --versionIf the installations were successful, you should see the PHP and Composer versions displayed.
6. Install Laravel Using Composer
Now that you have Composer installed, you can use it to install Laravel. Open the Terminal and run the following command to install Laravel globally on your system:
composer global require laravel/installerWait for the installation process to complete.
7. Verify Laravel Installation
To verify that Laravel was installed correctly, open the Terminal and run the following command:
laravel --versionYou will know that the installation is successful if you see the version of Laravel displayed.
8. Create a New Project
To create a new Laravel project, use the following command in the Terminal:
composer create-project --prefer-dist laravel/laravel app-nameReplace app-name with the desired name for your project. This command will create a new directory with the specified name and install the Laravel framework inside it.
Next, navigate to the newly created project directory:
cd app-nameRemember to replace app-name with the actual name you used for your project.
9. Run The Laravel Server
To start the local development server, execute the following command within the project directory:
php artisan serveThis command will launch a local development server on port 8000. You can access your Laravel application by opening your web browser and navigating to:
http://127.0.0.1:8000
You should now see the default Laravel welcome page, indicating that your application is running successfully. You can start building your Laravel application and see the changes live on the local development server.
How To Install Laravel on Linux
To install Laravel on Linux, follow these detailed steps:
- Install Apache Web Server
- Install PHP
- Install MariaDB
- Install Composer
- Verify PHP, MariaDB, and Composer Installations
- Install Laravel using Composer
- Run the Laravel server
To install Laravel on Linux, follow these detailed steps:
1. Install Apache Web Server
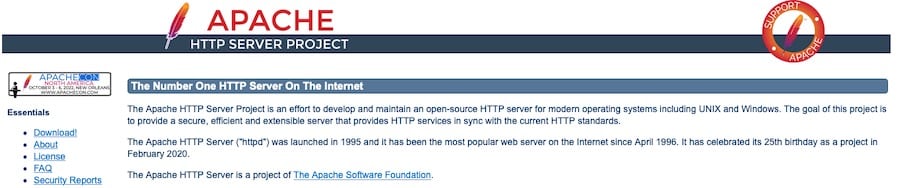
First, update your package index and install Apache by running the following commands in the Terminal:
sudo apt update sudo apt install apache2After installation, enable the Apache service and start it:
sudo systemctl enable apache2 sudo systemctl start apache22. Install PHP
To install PHP, use the following command in the Terminal:
sudo apt install php libapache2-mod-php php-mbstring php-xmlrpc php-soap php-gd php-xml php-cli php-zip php-bcmath php-tokenizer php-json php-pear3. Install MariaDB

MariaDB is an open-source relational database management system. Install it by running the following command:
sudo apt install mariadb-serverAfter installation, secure your MariaDB installation by running:
sudo mysql_secure_installationFollow the on-screen instructions to set up a root password and other security settings.
4. Install Composer
Composer is a dependency management tool for PHP. Download and install Composer by executing the following commands in the Terminal:
curl -sS https://getcomposer.org/installer | php
sudo mv composer.phar
sudo chmod +x /usr/local/bin/composer
5. Verify PHP, MariaDB, and Composer Installations
Ensure that PHP, MariaDB, and Composer are installed correctly by checking their versions with the following commands:
php -v mysql --version composer -V6. Install Laravel Using Composer
Now, install Laravel by running the following command in the Terminal:
composer create-project --prefer-dist laravel/laravel app-nameReplace app-name above with whatever you wish.
Then go to the newly created project directory:
cd app-name
7. Run the Laravel Server
To launch the development server for the project, go to the project directory and run the specified command.
php artisan serveQuiz Time
Subscribe to our email newsletter to get the latest posts delivered right to your email.
Comments